User Tools
Sidebar
hardwarerelated:raspberry_pi_4_tc358743
Table of Contents
What is this about?
Toshiba TC358743 based addon boards for the raspi are available, there is Linux support.
A summary of the HDMI grabbers I looked at is here.

- Building a HDMI signal grabber with the raspi would be nice, I got the idea from this site (Japanese)
- H2C-RPI-B01: the board I bought
- I use the Geekworm Raspberry pi 4 case, the board is mounted on top.
- Basically, there are 2 modes to use the board. This thread has the details.
- Via firmware
- Via kernel driver mode, more modern/bugs will rather be fixed there
- alternative: HDMI usb video capture, does also sound

What works for me as of now, what does not?
- grabbing HDMI of 720p@60Hz, and 1080p@50 Hz works
- I get no sound with the H2C-RPI-B01b out of the box, also not with 4 cables soldered. Ilia Davidov got audio with an additional piece of hardware, details below.
- I looked at several streaming software combinations, my goal is to stream low latency to a Linux desktop, over Gbit ethernet. mpegts stream, encoded by ffmpeg, looks most promising so far. For low latency streaming, I had best results with the firmware based approach.
- If not aiming at action games but for example videos, then caching and encoding with fewer artefacts can be used.
Basic setup for the H2C-RPI-B01, first test
From the 2 modes, this one uses the kernel code approach to control the TC358743. This approach is more modern and the one more likely to see bugfixing and development in the future. More details are here, here (yes, 600+ posts..), and here.
These use Raspbian or Raspbian-lite, with latest updates. First we install some packages, then we prepare config.txt to use our hardware. These dtparam/dtoverlay options lead to our Linux kernel detecting the hardware, and kernel modules getting loaded.
### Software we will use
$ apt install mplayer vlc git-core ffmpeg

### Enabling the devices we will use
vi /boot/config.txt
# Ensure the following are active/not commented out:
--------------------------------
   dtparam=i2c_arm=on
   dtparam=i2s=on
   dtparam=spi=on
   dtparam=i2c_vc=on
   dtparam=audio=on
   dtoverlay=vc4-fkms-v3d
   dtoverlay=dwc2
   dtoverlay=tc358743
   dtoverlay=tc358743-audio
   start_x=1
   gpu_mem=128
--------------------------------

### Now we reboot the system
reboot

### Verify if the module got loaded
root@pi4 31°C ~]$ dmesg | grep tc358743
[    4.183486] tc358743 0-000f: tc358743 found @ 0x1e (bcm2835 I2C adapter)
[root@pi4 31°C ~]$ lsmod|grep tc358743
tc358743               40960  1
v4l2_dv_timings        36864  2 bcm2835_unicam,tc358743
v4l2_fwnode            20480  2 bcm2835_unicam,tc358743
v4l2_common            16384  3 bcm2835_unicam,bcm2835_v4l2,tc358743
videodev              200704  9 bcm2835_unicam,v4l2_fwnode,bcm2835_codec,v4l2_common,[..]
media                  36864  5 bcm2835_unicam,bcm2835_codec,videodev,v4l2_mem2mem,tc358743
[root@pi 31°C ~]$
For reading the HDMI stream, the HDMI source and our grabber card have to agree on a video mode. EDID is used for this: monitors or our grabber card can with this offer modes to the HDMI source, and agree on one mode. When using the firmware driven approach (more details in a later section), the application (i.e. raspivid) is setting the EDID. Here with the kernel approach, we have to use a file and explicitly use a command to offer the EDID data to the peer.
# Further variant for an EDID file:
# wget https://raw.githubusercontent.com/6by9/RPiTest/master/1080P50EDID.txt
git clone https://github.com/mzyy94/ns-remote
v4l2-ctl --set-edid=file=ns-remote/720P30EDID.txt
v4l2-ctl --set-dv-bt-timings query
You might have to execute the last comment twice or three times, to see “BT timings set”. With an appropriate HDMI source, our card should now have agreed on a mode. Reminder: the H2C-RPI-B01 offers for example 1280×720@60Hz or 1920×1080@25Hz, but not 1920×1080@60Hz. So with a HDMI source only offering that, we will not come to an agreement (or we will simply then not be able to process the data).
# Now we can query which mode has been agreed on:
v4l2-ctl --query-dv-timings

# Optionally, to list all supported modes:
v4l2-ctl --list-dv-timings

# Optionally, one can try to set one of the modes from "list-dev-timings":
v4l2-ctl --set-dv-bt-timings <parameters>
If these steps looked good, we can try to grab HDMI and record into a h264 file, which is playable via VLC. This records for 10 seconds, without sound. Details.
git clone  https://github.com/6by9/yavta
cd yavta/
make
./yavta --capture=1000 -n 3 --encode-to=file.h264 -f UYVY -m -T /dev/video0
Kernel based streaming, aimed at low latency
For this, we will use ustreamer. This is the best solution I found for low latency. I did not get ustreamer to work with firmware mode, just with kernel mode. When streaming this over gbit ethernet, I get 100-130ms latency.
# preparations
sudo apt install libevent-dev libjpeg8-dev uuid-dev libbsd-dev git
git clone --depth=1 https://github.com/pikvm/ustreamer
cd ustreamer/
make WITH_OMX=1
./ustreamer --device=/dev/video0 -r 1280x720 --format=uyvy --encoder=omx \
  --workers=3 --persistent --drop-same-frames=30 --host=0.0.0.0 --port=8080

# On the client, open this with firefox:
http://<ip-of-raspi>:8080/stream
Kernel based streaming, not aimed at low latency
Aiming at low bandwidth usage, one can encode before sending over the network. This gives 10+ sec latency, at 130kbyte/sec bandwidth used.
# Server: the process to be started on the Raspi
#   exchange the ip with your clients IP, who should receive the stream

# reencoding x264
./yavta -f UYVY --capture=3000 -n 3 --encode-to=- -m -T /dev/video0 | \
  ffmpeg -i - -preset ultrafast -vcodec libx264 -tune zerolatency \
  -f mpegts udp://192.168.0.2:4242
# This is unfortunately reeoncoding in mpegts
./yavta -f UYVY --capture=3000 -n 3 --encode-to=- -m -T /dev/video0 | \
  ffmpeg -i - -r 60 -vcodec mpeg2video -f mpegts udp://192.168.0.2:4242
# I did not manage to plainly copy the x264 data from yavta
./yavta -f UYVY --capture=3000 -n 3 --encode-to=- -m -T /dev/video0 | \
  ffmpeg -i - -f h264 -c libx264 -preset ultrafast udp://192.168.0.2:4242

# Client process, exchange with the IP of the Raspi who sends the stream:
ffplay -an -sn -i -fflags nobuffer udp://192.168.0.3:4242?listen
ffplay -analyzeduration 1 -fflags -nobuffer -probesize 32 -sync ext \
  -i udp://192.168.0.3:4242?listen
Kernel based streaming, rtp protocol
This uses the TC358743 h264 encoding, so almost no load on the Raspberry. For me, still some seconds of delay.
# On Raspi/server side
./yavta -f UYVY --capture -n 3 --encode-to=- -m -T /dev/video0 | \
  ffmpeg -i - -c:v copy -an -f rtp rtp://<your-clients-IP>:4242

# A section similar like the following will be output, and
# needs to be copied into a file on the client, for example
# called stream.spd
SDP:
v=0
o=- 0 0 IN IP4 127.0.0.1
s=No Name
c=IN IP4 192.168.0.2
t=0 0
a=tool:libavformat 58.20.100
m=video 4242 RTP/AVP 96
a=rtpmap:96 H264/90000
a=fmtp:96 packetization-mode=1; sprop-parameter-sets=J2QAKKwrQCgC3QDxImo=,KO4CXLAA; profile-level-id=640028

# On the client side:
ffplay -i -protocol_whitelist file,udp,rtp stream.spd
Using the firmware approach
Besides the kernel code approach, there is the older firmware based approach. The kernel code which is more modern way which also gets supported in the future. For simplicity, this uses mplayer and X-forwarding via SSH: resource and bandwidth hungry, and with delay.
### Let's have raspi-config set to options and reboot
$ raspi-config nonint do_camera 0

### raspi-config has modified config.txt for us.  If the kernel
### approach was used on the system, the dtoverlay/dtparam options
### for kernel mode need to be disabled.
$ cat /boot/config.txt
| [..]
| # These should be disabled like this for userland/firmware access
| # dtoverlay=dwc2
| # dtoverlay=tc358743
| start_x=1
| gpu_mem=128
$ reboot

### Now, the camera should get reported as detected.
### The output of this command is not relevant when working
### with the kernel modules.
$ vcgencmd get_camera
supported=1 detected=1
$ ls -al /dev/video0
crw-rw---- 1 root video 81, 3 May 19 12:04 /dev/video0

### Now a first test can be made.  I used a Fedora 32
### desktop to supply HDMI signal.  Can also be other sources,
### which offer any of these modes.  Preferably 720p@60Hz.
[desktop]$ xrandr
[...]
HDMI-1 connected 1280x720+0+0 (normal left inverted right x axis y axis) 708mm x 398mm
   1280x720      60.00*+  50.00    59.94
   1440x480i     59.94
   720x480       60.00    59.94    59.94
   720x480i      60.00    59.94
   640x480       60.00    59.94
[..]

### Explicitly setting 720p, and moving below the thinkpad display
[desktop]$ xrandr --output HDMI-1 --mode 1280x720
[desktop]$ xrandr --output HDMI-1 --below eDP-1

### In one terminal on the Fedora desktop, I run a loop:
[desktop]$ while :; do xrandr | grep HDMI-1; sleep 1; done

### Then, I can use ssh X forwarding from the raspi to see the
### second screen.  The delay is bad, but it works as test
$ mplayer tv:// -tv driver=v4l2:device=/dev/video0:width=1280:height=720:fps=30:outfmt=yuy2
Firmware based streaming
At the moment, my goal is just to stream over the gbit NIC to a different linux system, with low latency and as few artefacts as possible. ffmpeg does this best for me currently. Over gbit, I have 0.3ms RTT between both systems, the following uses 300kbyte/sec bandwidth. This again just uses firmware for access, not the chips kernel drivers.
# Server: the process to be started on the Raspi
#   exchange the ip with your clients IP, who should receive the stream
ffmpeg -f v4l2 -input_format yuyv422 -s 1280x720 -r 60 -i /dev/video0 \
  -tune zerolatency -vcodec mpeg2video -f mpegts udp://192.168.0.2:4242
# Client process, exchange with the IP of the Raspi sending the stream:
ffplay -an -sn -i -fflags nobuffer udp://192.168.0.3:4242?listen
Grabbing 1080p mode
At that point, I was debugging for very long, puzzled about no 1920×1080 modes getting grabbed by the board. Seems like no 60Hz can be grabbed, but 25, 30 or 50Hz. The chip can do more, but the 2 lane CSI2 bus to the Raspi is the bottleneck here.
These modes are apparently not offered by all HDMI providing devices. My desktop with Xorg/Fedora can be configured to provide it, you need to explicitly create modes for 1080p at 25/30/50Hz. I described a similar computation of the modeline for my Samsung TV, where my HDMI connection limits to only 4k@25Hz. You should not need to compile “cvt12” as I did, you can directly add the mode with the values I used.
[desktop]$ ./cvt12 1920 1080 25
# 1920x1080 @ 25.000 Hz (CVT) field rate 24.928 Hz; hsync: 27.396 kHz; pclk: 65.75 MHz
Modeline "1920x1080_25.00"  65.75  1920 1968 2160 2400  1080 1083 1088 1099 -hsync +vsync
[desktop]$ xrandr --newmode "1920x1080_25.00"  65.75  1920 1968 2160 2400  1080 1083 1088 1099 -hsync +vsync
[desktop]$ xrandr --newmode "1920x1080_30.00"  79.75  1920 1976 2168 2416  1080 1083 1088 1102 -hsync +vsync
[desktop]$ xrandr --newmode "1920x1080_50.00"  141.50  1920 2032 2232 2544  1080 1083 1088 1114 -hsync +vsync
[desktop]$ xrandr --output HDMI-1 --mode 1920x1080_50.00

# Now at that point, we can grab 1920x1080@25Hz on the pi4, firmware mode:
mplayer tv:// -tv driver=v4l2:device=/dev/video0:width=1920:height=1080:fps=50:outfmt=yuy2
# ..or with the kernel drivers:
yavta --capture=1000 -n 3 --encode-to=file.h264 -f UYVY -m -T /dev/video0
vlc file.h264
Testing video stream server/client combinations
At that point, we have signal at /dev/video0. Let's look at something more convenient to get it do a different system. Apart of the first 2 commands, all of these just work in userland/firmware mode (or not at all).
# get details about the current video source, userland/kernel mode.
v4l2-ctl --list-devices
v4l2-ctl --all

# directly playing the video0 device, run on the pi4 terminal.
# Works, but needs much bandwidth, of course.
mplayer tv:// -tv driver=v4l2:device=/dev/video0:width=1280:height=720:fps=30:outfmt=yuy2

# get gstreamer
apt install -y gstreamer1.0-tools gstreamer1.0-nice gstreamer1.0-plugins-bad \
  gstreamer1.0-plugins-ugly gstreamer1.0-plugins-good gstreamer1.0-omx

# kernel based recording, with ffmpeg
./yavta -f UYVY --capture=3000 -n 3 --encode-to=- -m -T /dev/video0 | \
  ffmpeg -i - -r 30 -vcodec copy file.mp4

# This uses ~300kbyte/sec, has just some seconds latency over
# gbit network (0.3ms RTT), but has also artifacts.
# server, ip is the client IP
ffmpeg -f v4l2 -input_format yuyv422 -s 1280x720 -i /dev/video0 \
  -vcodec mpeg2video -f mpegts -threads 4 udp://192.168.0.2:4242
# on the client
ffplay -an -sn -i -fflags nobuffer udp://192.168.0.2:4242?listen

# Much better quality, but 20+ sec latency:
ffmpeg -an -sn -s 1280x720 -r 30 -f v4l2 -input_format yuyv422 \
  -i /dev/video0 -vcodec libx264 -crf 18 -tune zerolatency \
  -preset ultrafast -pix_fmt yuv420p -profile:v baseline \
  -f mpegts -threads 4 udp://192.168.0.2:4242

# this works, and has very bad (many seconds) lag
# receiver, run this:
gst-launch-1.0 -v udpsrc port=5000 caps = \
  "application/x-rtp, media=(string)video, clock-rate=(int)90000, \
  encoding-name=(string)H264, payload=(int)96" ! rtph264depay ! \
  decodebin ! videoconvert ! autovideosink
# on the sender (raspi), this (exchange the IP with the IP of your receiver):
gst-launch-1.0 v4l2src ! video/x-h264,width=1280,height=720,\
  framerate=30/1,bitrate=500000 ! h264parse ! rtph264pay config-interval=-1 \
  pt=96 ! udpsink host=192.168.0.2 port=5000
gst-launch-1.0 v4l2h264enc ! video/x-h264,width=1280,height=720,\
  framerate=30/1,bitrate=500000 ! h264parse ! rtph264pay config-interval=-1 \
  pt=96 ! udpsink host=192.168.0.2 port=5000

# This works too, but huge delay
# server
raspivid -o - -t 60 -w 1280 -h 720 -fps 60 | \
  cvlc -vvv stream:///dev/stdin --sout '#standard{access=http,mux=ts,dst=:8160}' :demux=h264
# client
vlc http://192.168.0.3:8160
# or
mplayer -cache 2048 http://192.168.0.3:8160

# https://trac.ffmpeg.org/wiki/StreamingGuide
ffmpeg -f v4l2 -list_formats all -i /dev/video0
ffmpeg -f v4l2 -framerate 60 -video_size 1280x720 -i /dev/video0 output.mkv
ffmpeg -f v4l2 -framerate 60 -video_size 1280x720 -i /dev/video0 \
  -preset ultrafast -vcodec libx264 -tune zerolatency -b 900k -f mpegts udp://192.168.0.2:1234

# server, streaming via http
raspivid -w 1280 -h 720 -t 60 -o - | \
  cvlc -vvv - --noaudio --no-sout-audio --sout '#standard{access=http,mux=ts,dst=:8090}'
# client, vlc or mplayer:
vlc rtsp://<raspi4-ip>:8554/

# Should record into a file, not working for me
raspivid -w 1280 -h 720 -fps 60 -o /tmp/rec.h264

# server, this fails with:
# ERROR: from element /GstPipeline:pipeline0/GstV4l2Src:v4l2src0: Device '/dev/video0' has no supported format
gst-launch-1.0 v4l2src ! \
  video/x-h264,width=1280,height=720,framerate=30/1,bitrate=500000 ! \
  h264parse ! rtph264pay config-interval=-1 pt=96 ! udpsink host=192.168.0.3 port=5678
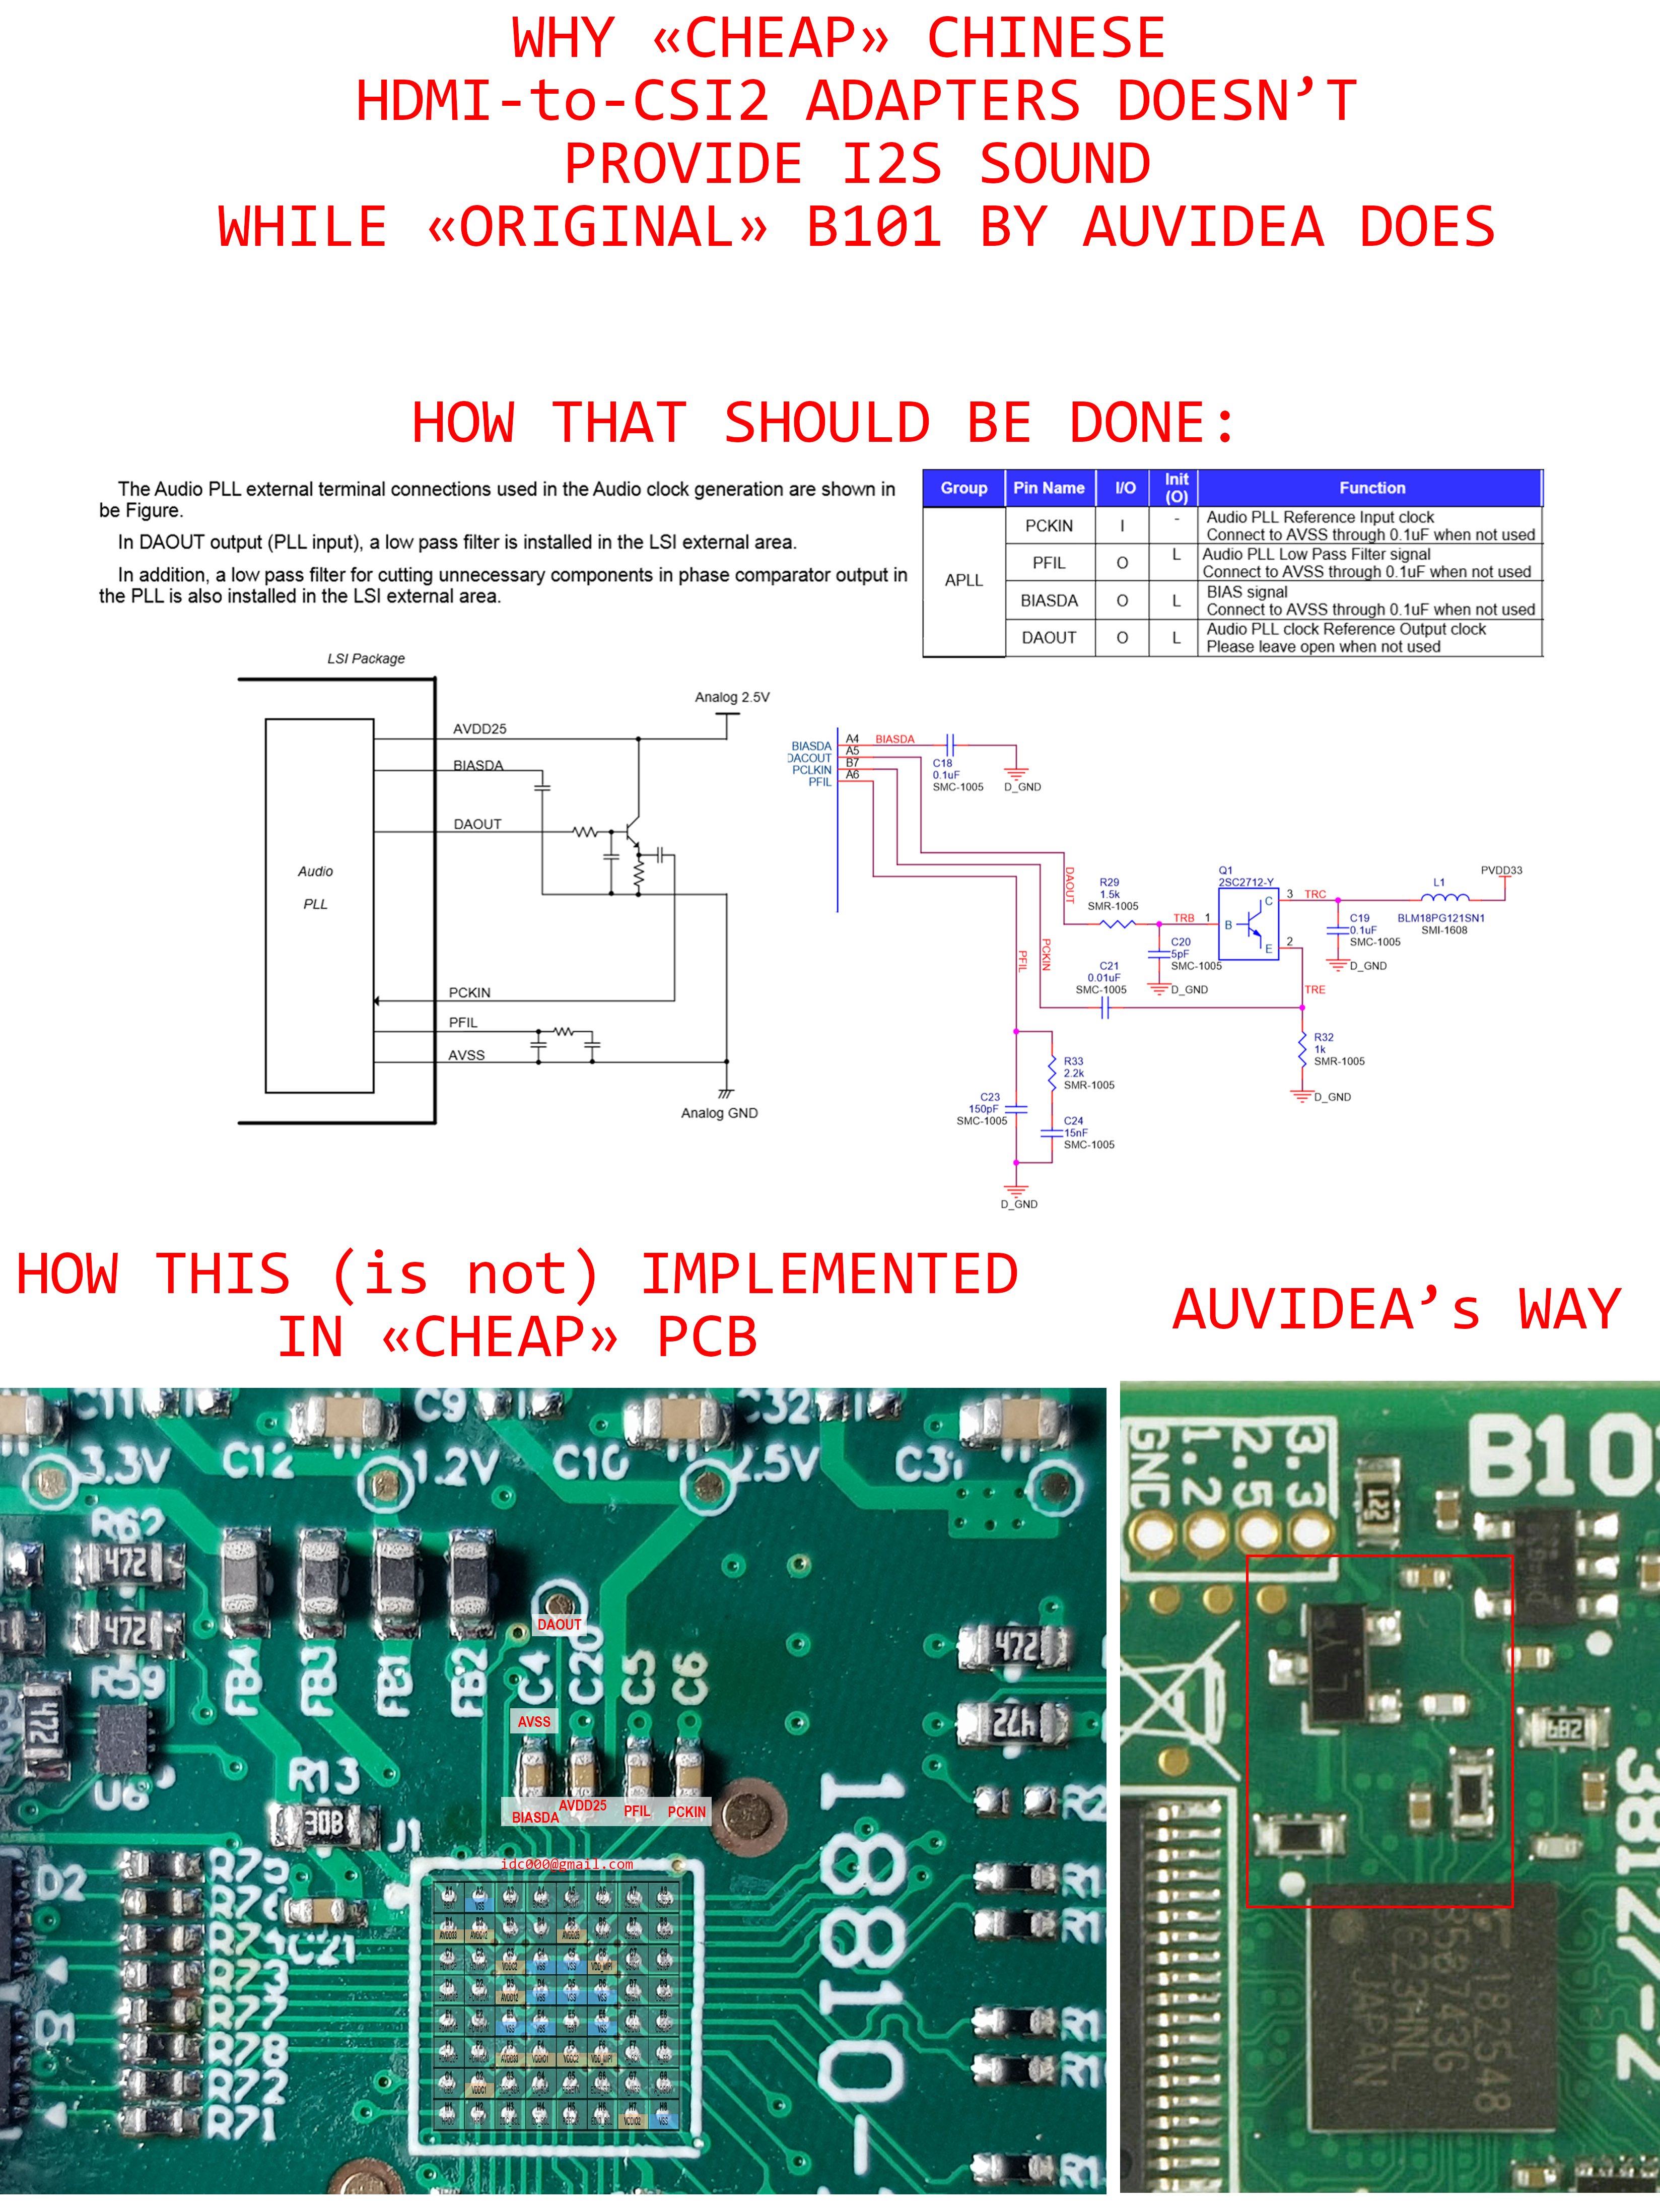
My (unsucessful) attempts to grab audio from the HDMI stream
- First: I noticed that no audio is captured from the HDMI stream. Below pieces help to understand that better, but do not fix it, even with the 4 wires soldered. See below for the fix from Ilja.
- It seems like technically, audio could be sent via CSI2 (the interface cable H2C-RPI-B01 ↔ Raspi4) on an alternate data type. source
- Based on the “I2S SYNC error!”, it seemed most likely that additional wires are required, source. For me, also after connecting these I still get “I2S SYNC error!” and audio grabbing is not possible.
- “You'll need to solder either wires or a header to those holes, and then connect across to the relevant pins on the 40pin header of the Pi. Do exercise some caution when soldering to ensure you don't short anything to either 3.3V or GND. IR, INT, RST, OSCL and 3.3V can all be ignored.”
- or: GPIO hammer header
| Signal   | B101 header | H2C-RPI-B01 header | Pi 40 pin header |
|----------|:-----------:|:------------------:|:----------------:|
| LRCK/WFS |     7       |       10 ("WFS")   |      19          |
| BCK/SCK  |     6       |        8 ("SCK")   |      18          |
| DATA/SD  |     5       |        7 ("SD")    |      20          |
| GND      |     8       |        6 ("GND")   |      39          |
- Twitter user mzyy94 had tried to solder the 4 cables, but still got no sound.
- Only other idea would be to reach out to the maker of the H2C-RPI-B01, will try that.
# Does our HDMI stream offer audio at all?
v4l2-ctl --list-ctrls
| audio_present (bool)   : default=0 value=0 flags=read-only
|    => value=0, no audio sent via HDMI
| audio_present 0x00981981 (bool)   : default=0 value=1 flags=read-only
|    => value=1, audio from HDMI is received
| audio_sampling_rate (int)    : min=0 max=768000 step=1 default=0 value=0 flags=read-only "
|    => value=0, the sampling rate can't be identified
| audio_sampling_rate 0x00981980 (int)    : min=0 max=768000 step=1 default=0 value=48000 flags=read-only
|    => value=XX, looks good

# https://www.raspberrypi.org/forums/viewtopic.php?f=38&t=120702&sid=42e6acf1c8882cfadc40ed4ae3670fe0&start=650#p1665538
# Now, one _should_ be able to record audio, but it fails for me:
# query devices
arecord -l
# cd sambling rate:
arecord -D hw:1,0 -d 25 -f cd test1.wav
# dat samling rate (48000):
arecord -D hw:1,0 -d 25 -f dat test2.wav
Recording WAVE 'test2.wav' : Signed 16 bit Little Endian, Rate 48000 Hz, Stereo
arecord: pcm_read:2145: read error: Input/output error
$ dmesg|tail -1
[  598.192045] bcm2835-i2s fe203000.i2s: I2S SYNC error!
Audio grabbing with additional hardware
The following details were kindly contributed by Ilia Davidov. Details on the required additional hardware are here, and more details in this forum thread. Ilja designed a small additional PCB/board and attached it to the H2C-RPI-B01.
Playground
gstreamer over cable was ok but i did not invest more time there yet
- h264 raw from yavta is quick
- gstreamer an option, also ffmpeg (but might be slow)
---------
gst-launch-1.0 -vvv -e v4l2src ! video/x-raw,format=UYVY,framerate=60/1 ! \
  omxh264enc target-bitrate=2000000 control-rate=variable ! h264parse ! \
  matroskamux ! filesink location=foo.mkv
--------------
# Debug approaches:
Check "dmesg" for errors.
Check "sudo vcdbg log msg" for errors. Ideally add "dtdebug=1" to config.txt
  and reboot first as it will give a load of debug whilst adding the overlays.
Check "raspi-gpio get" for which GPIOs are mapped to SCL0 and SDA0 - it
  should be the ones you've connected to.
You should have /dev/i2c0 present (it's enabled by the overlay). Use
  "i2cdetect -y 0" to probe for devices on it. The TC358743 should report
  as address 0F.
Check /proc/device-tree/soc/csi1@7e801000/. Does "status" report "okay"?
Is "/proc/device-tree/soc/csi1@7e801000/port/endpoint/remote-endpoint" defined?


gst-launch-1.0 -vvv -e v4l2src ! video/x-raw,format=UYVY,framerate=60/1,colorimetry=bt601 ! \
  omxh264enc target-bitrate=2000000 control-rate=variable ! h264parse ! queue ! \
  matroskamux name=mux ! filesink location=foo.mkv alsasrc device=hw:1,0 ! \
  audio/x-raw,rate=48000 ! queue ! avenc_aac ! aacparse ! mux.
gst-inspect-1.0 | grep aac

gst-launch-1.0 v4l2src device=/dev/video0 ! video/x-h264,width=1280,height=720,framerate=60/1 ! h264parse ! rtph264pay ! udpsink host=192.168.0.2 port=5000
Setting pipeline to PAUSED ...
Pipeline is live and does not need PREROLL ...
ERROR: from element /GstPipeline:pipeline0/GstV4l2Src:v4l2src0: Internal data stream error.
Additional debug info:
gstbasesrc.c(3055): gst_base_src_loop (): /GstPipeline:pipeline0/GstV4l2Src:v4l2src0:
streaming stopped, reason not-negotiated (-4)
ERROR: pipeline doesn't want to preroll.
Setting pipeline to PAUSED ...
Setting pipeline to READY ...
Setting pipeline to NULL ...
Freeing pipeline ...
- TODO
- kernel module debug parameters: https://www.raspberrypi.org/forums/viewtopic.php?f=38&t=120702&start=450#p1389665
- uv4l approach. It's a separate application, no free source code, but might be usable.
hardwarerelated/raspberry_pi_4_tc358743.txt · Last modified: 2024/03/03 07:21 by chris
Page Tools
Except where otherwise noted, content on this wiki is licensed under the following license: CC Attribution-Share Alike 4.0 International
